advanced creo techniques
PTC provided a webinar to our team based on the questions we were asking. In designing this year's robot, we took a more free form approach which didn't lend itself to using much of the "Kit of Parts". While we were making progress, the parts weren't interacting the way we wanted and there were some features we didn't know how to add. Scott Morris taught us quite a bit about the construction techniques to be used in creating a part which makes that parts scalable and interdependent. We came away thinking that a good drawing isn't as much about the shape of the part, but rather how you got there.
The seminar was three and a half hours long, so much more than we could remember after one pass. To keep these lessons fresh, we have a recording of the session: https://ptc.webex.com/ptc/lsr.php?RCID=550ed4feb65166827447aec46b34e58e
The seminar was three and a half hours long, so much more than we could remember after one pass. To keep these lessons fresh, we have a recording of the session: https://ptc.webex.com/ptc/lsr.php?RCID=550ed4feb65166827447aec46b34e58e
robotC curriculum
Lego Education RobotC for Mindstorms: http://www.education.rec.ri.cmu.edu/previews/robot_c_products/teaching_rc_tetrix_preview/
RobotC 4.x download: http://www.robotc.net/download/lego/
RobotC 3.x download: http://www.robotc.net/download/nxt/
PDF Files on Programming Topics
RobotC 4.x download: http://www.robotc.net/download/lego/
RobotC 3.x download: http://www.robotc.net/download/nxt/
PDF Files on Programming Topics
Scholarship information
PTC windchill
PTC Windchill can be accessed through the invitation which was emailed to you or by going through their academic portal: https://academic.ptc.com/Windchill/app/·
You will be prompted for your username and password to access the site. Your username is your email address.
Click the Navigator project tab and select your team project name from the list.·
Other links to keep in mind:
You will be prompted for your username and password to access the site. Your username is your email address.
Click the Navigator project tab and select your team project name from the list.·
Other links to keep in mind:
- http://www.ptc.com/go/first - The "PTC FIRST” page includes all FIRST and PTC related resources for teams (24/7 online tutorials, Software Downloads, Sponsorship for FIRST, News etc.).
- www.ptc.com/go/firstkop - Complete FTC and FRC Kit of Parts will be modeled in PTC Creo and posted soon
- http://www.ptc.com/communities/academic-program/k12/students/first/software - Download PTC Mathcad Prime 2.0 and PTC Creo 2.0
- PTC FIRST Main Webpage - ptc.com/go/first
- Windchill Document Management application: https://academic.ptc.com/Windchill/install/msoi/x64/setup.exe
- Creo VIEW 64 bit: https://academic.ptc.com/Windchill/wtcore/jsp/wvs/download/i486_nt_productview/CreoView_64.exe
- Creo VIEW 32 bit: https://academic.ptc.com/Windchill/wtcore/jsp/wvs/download/i486_nt_productview/CreoView_32.exe
- Creo VIEW ECAD 64bit: https://academic.ptc.com/Windchill/wtcore/jsp/wvs/download/ecad_adapters/CreoView_ECAD_Adapters_64.exe
- Creo VIEW ECAD 32bit: https://academic.ptc.com/Windchill/wtcore/jsp/wvs/download/ecad_adapters/CreoView_ECAD_Adapters_32.exe
Diameters
Link to a list of Illinois FTC teams
PTC communities education and videos
PTC has informative seminars on Wednesday nights for FTC Teams to help them figure out Creo and other technical issues. They cover a wide range of interesting topics. If you can't make the webinar in real time, they are posting the recordings on-line on their Communities webpage. http://communities.ptc.com/community/academic-program/first?view=video
ROBOTalk - Session 1 - September 17, 2014 - Introduction to Product Development and PTC Creo - http://communities.ptc.com/docs/DOC-6351
In this introductory webinar, we discussed the product development process and how it applies to robot development for FIRST teams. We also introduced the PTC FIRST website, discussed what software is available for FIRST teams to download, and quickly previewed PTC Creo.
Recorded Video Link - https://ptc.webex.com/ptc/lsr.php?RCID=ff38a55a10672a8bad20374ccaa23168
______________________________________________________
ROBOTalk - Session 2 - September 24, 2014 - Team Organization, Intro to PTC WindChill and Volume Allocation in PTC Creo - http://communities.ptc.com/docs/DOC-6373
In our second webinar of the season, we discussed organizing teams for success, along with a brief introduction to project planning and PTC Windchill. We also introduced how a team can break down game requirements into robot requirements, and how those robot requirements will translate into volume allocations in PTC Creo.
Recorded Video Link – https://ptc.webex.com/ptc/lsr.php?RCID=e188e27eb6096449fefa2ac425590665
______________________________________________________
ROBOTalk - Session 3 - October 1, 2014 - Brainstorming and 2D/3D Conceptual Models - http://communities.ptc.com/docs/DOC-6384
In our third webinar of the season, we discussed brainstorming tips and tricks for teams, along with how to create conceptual designs in PTC Creo in both 2D sketches and in 3D solid models. We also watched Mark Cheli create a conceptual scissor lift design in about 15 minutes.
Recorded Video Link - https://ptc.webex.com/ptc/ldr.php?RCID=0f1b1ca8f30c9a40293e34f041bcc75b
______________________________________________________
RoboTalk - Session 4 - October 8, 2014 - Fundraising and Subassemblies in PTC Creo - http://communities.ptc.com/docs/DOC-6390
In our fourth webinar of the season, we discussed fundraising for teams, along with how to create subassemblies in PTC Creo. We also toured the newest curriculum by the PTC Academic team, called “How to Model Almost Anything” version 2.
Recorded Video Link - https://ptc.webex.com/ptc/ldr.php?RCID=3eb0ca8bb4ce65accfc2d95d18986cea
______________________________________________________
RoboTalk - Session 5 - October 15, 2014 - Team Spirit, Subassemblies and the new Andy Mark FRC Chassis Model - http://communities.ptc.com/docs/DOC-6425
In our fifth webinar of the season, we discussed team spirit, along with how to create subassemblies in PTC Creo. We also learned about the new AM-14U CAD model and recent updates to the Academic Windchill server.
Recorded Video Link - https://ptc.webex.com/ptc/ldr.php?RCID=d159e17845be5c7e8275d4b21bf14a86
______________________________________________________
ROBOTalk 2014 - Session 6 - October 22, 2014 - Team Scouting and Creating a Custom Part in PTC Creo
http://communities.ptc.com/docs/DOC-6432
In our sixth webinar of the season, we discussed team scouting, along with how to create a custom grill/scoop in PTC Creo
Recorded Video Download: https://ptc.webex.com/ptc/ldr.php?RCID=99eff35eb8b2d7b6ab6078edc163ccfc
______________________________________________________
ROBOTalk 2014 - Session 7 - October 29, 2014 - Judging at FIRST events and Building Using the Kit of Parts
http://communities.ptc.com/docs/DOC-6461
In our seventh webinar of the season, we discussed judging at FIRST events, how to build an FTC drive train from the kit of parts, a segment on working with imported 80/20 extrusions and how to make your own custom gear using patterns in PTC Creo.
Recorded Video Download: https://ptc.webex.com/ptc/ldr.php?RCID=681748ad1764072f323a5c64f19289d5
______________________________________________________
ROBOTalk 2014 - Session 8 - November 6, 2014 - Community Outreach, Simulation in PTC Creo and Windchill Tips
http://communities.ptc.com/docs/DOC-6456
In our eighth webinar of the season, we discussed community outreach for teams, along with a segment on different types of robot analyses that teams can do in PTC Creo (mass properties, kinematics, dynamics, and stress analysis). We also had a guest speaker and FIRST team mentor, Josh Houser, review how they maintain just one Windchill project across multiple teams.
Recorded Video Download: https://ptc.webex.com/ptc/ldr.php?RCID=d70061be3650307f6478f29fdce05cef
______________________________________________________
ROBOTalk 2014 – Session 9 – November 13, 2014 - Business Plans, Mathcad and Sketches in PTC Creo -http://communities.ptc.com/docs/DOC-6491
In our ninth webinar of the season, we discussed the importance of business plans for teams, along with a segment on how to uses sketches in PTC Creo to complement the design process. We also had a guest speaker and Mathcad expert, John Sheehan, review how teams can use the power of natural equations in PTC Mathcad to solve some of the more difficult problems encountered in robot design like 2-jointed arm motion.
Recorded Video Download:
https://ptc.webex.com/ptc/ldr.php?RCID=9fc6794e9975354e0e67f8328cef2fb4
______________________________________________________
Teams post animations of their robots, which is useful if you are looking for other approaches to a problem. Check out the animation we brought to State at this address: http://communities.ptc.com/videos/5323
Lego education phone number
Q: What if I ordered my product and it hasn’t arrived yet?
A: Please contact LEGO Education at 1-800-453-4652
Q: What do I do if my coupon code is not working?
A: If you are experiencing difficulties with your coupon code while purchasing your product, please contact LEGO Education at 1-800-453-4652. If you are experiencing difficulties with your coupon code in the TIMS system please contact FIRST Operations Department at 603-666-3906 ext. 0
electrostatic discharge
Electrostatic Discharge is a problem during matches causing NXT lockup. Usually the only recourse is to disconnect the battery and reconnect it. What you may not know is that ESC damage is cumulative. Repeated static discharge can damage the electronics over time and cause the degrading and failure of your NXT. Precautions should be taken at home as well as at matches.
Attached is a video and a document which provide mitigation to ESC through good design and newly allowed surge protectors and chokes. The video also talks about what to do if you have been shutdown during a match.
Attached is a video and a document which provide mitigation to ESC through good design and newly allowed surge protectors and chokes. The video also talks about what to do if you have been shutdown during a match.
|
|
| ||||||
Tetrix Motor curves - power vs torque
Tetrix DC Drive Motor W739083 dynamometer data - this information is clipped from a Chief Delphi forum.
I got some of the W739083 Tetrix motors (12V, 152 RPM marking) to test in my lab. We performed dynamometer tests to measure the output mechanical power vs. torque, for two types of electrical source: (1) a regulated 12V laboratory bench supply, and (2) a standard 12V (marked) W739057 Tetrix NiMH battery pack. We did not measure the battery voltage; however, the (unloaded) initial motor speed when fed from the battery probably indicates variation of its voltage due to the previous test. Some charging was done between tests.
We repeated the power curve measurements for four sample motors. Three showed consistent performance, and one was slightly lower. Results follow:
----------------
With regulated 12V dc supply:
Motor 1: 10.8 Watts peak output mechanical power at ~75 RPM, 145 RPM initial motor speed
Motor 2: 10.8 Watts peak output mechanical power at ~75 RPM, 145 RPM initial motor speed
Motor 3: 10.1 Watts peak output mechanical power at ~75 RPM, 143 RPM initial motor speed
Motor 4: 10.9 Watts peak output mechanical power at ~75 RPM, 148 RPM initial motor speed
With Tetrix battery: (voltage > 14V)
Motor 1: 16.5 Watts peak output mechanical power at ~90 RPM, 178 RPM initial motor speed
Motor 2: 16.0 Watts peak output mechanical power at ~90 RPM, 173 RPM initial motor speed
Motor 3: 14.2 Watts peak output mechanical power at ~90 RPM, 172 RPM initial motor speed
Motor 4: 15.2 Watts peak output mechanical power at ~90 RPM, 176 RPM initial motor speed
Here is some posts from the Chief Delphi forum where several teams were trying to calculate the gearing or wheel diameter needed to climb a tower in a specified time using these motors. The math is interesting:
Sorry, I should have expressed that a little more clearly.
I meant a 2:1 speed INCREASE from motor shaft to wheel. Effectively making a 4" wheel behave like an 8" wheel mounted directly on the motor shaft.
Here's how I did the math:
Climb height = 110 inch (2.79 meter)
Energy = height X weight = height X mass X g
Energy (Joule) = height (meter) X mass (kg) X 9.8 m/sec^2
Example: if mass is 5 lb (2.27 kg) then energy = 62.2 Joule
Maximum motor output power (assuming a full Tetrix battery) is about 15 Watt at 90 RPM -- operating at different RPM will REDUCE the power.
Time to climb = Energy / Climbing Power
Climbing Power = Motor Power X drivetrain efficiency
If drivetrain efficiency is 75% and two motors are used, then Climbing Power is 30 X .75 = 22.5 Watt. So, Time to Climb is 62.2 / 22.5 = 2.8 seconds, and climbing speed is 110 inch / 2.8 sec = 39.8 inch/sec. If 4 inch diameter wheels are used, then wheel speed is 39.8 / 4*pi = 3.2 rev/sec = 190 RPM. To match this wheel speed to the 90 RPM motor speed, the gear ratio is 190/90 or ~2.
Thanks for the data Richard!
4"x1:1 versus 3"x1:2
(4"x1:1 is a 4" wheel with a 1:1 ratio, direct driven; 3"x1:2 is a 3" wheel with a 80T gear on the motor and a 40T gear on the wheel)
Since mass will affect every race, is the added mass to get a 1:2 gearing on a 3" wheel worth the complexity versus a direct drive 4" wheel? I don't think so. My charts show that a 3"x1:2 is only 0.1 seconds faster than a 4"x1:1 since adding gears adds weight (gear mounting, extra axle primarily). I'd suggest trying it with both and seeing what you gain from the flexibility in the design from 4"x1:1.
Edit -- Whoops -- the calculator didn't factor in another efficiency drop due to the extra gears -- so now 3"x2:1 is just on par with 4"x1:1.
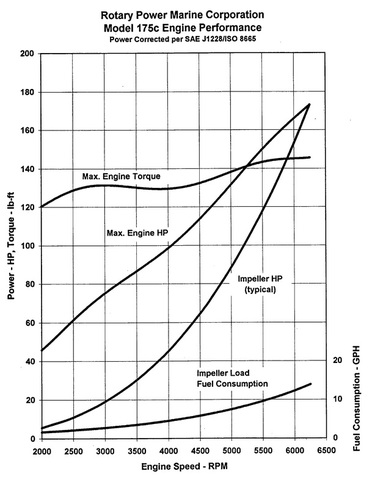
For a given voltage, a DC motor has the most Power output at about half of its free speed. Torque is highest at stall, and decreases linearly to zero torque at free speed.
Here is a good example of engineering study and reasoning effecting the design choices:
Some folks here on CD have asked for a bit more data, so I am adding it here.
We used another of our dynamometers to measure mechanical output and efficiency for two of the Textric DC Drive motors (units 2 and 3 from the original post), with their gearheads removed. This gives some insight to the electrical and mechanical power losses.
At 12V dc, these two motors developed peak shaft powers ~ 17.6 and 15.8 Watts, respectively -- this is about 7 Watts more than was measured when the motors were tested with gearheads. That difference is the mechanical power loss in the gearhead, at peak loading.
Also, at peak shaft powers these two motors showed electromechanical efficiencies ~ 45% and 40%, respectively. In other words, motor 2 consumed 17.6 / 0.45 = 39 Watts, and motor 3 consumed 15.8 / 0.4 = 39.5 Watts, from the 12V dc supply. So motor 2 wasted 39 - 17.6 = 21.4 Watts, and motor 3 wasted 39.5 - 15.8 = 23.7 Watts, due to heating of their respective armature windings. These are the motors' electrical losses.
My conclusion -- teams might gain an advantage in climbing power by replacing the gearheads on these motors with more mechanically efficient alternatives, but the potential benefit is probably only a few Watts (my guess is 2 to 4 Watts). The time a team would spend refitting Tetrix motors with more efficient gearheads is probably better spent working on faster minibot deployment methods.
I am attaching a power curve for a Wankel engine just to show how different internal combustion engines are from electrical motors.
I got some of the W739083 Tetrix motors (12V, 152 RPM marking) to test in my lab. We performed dynamometer tests to measure the output mechanical power vs. torque, for two types of electrical source: (1) a regulated 12V laboratory bench supply, and (2) a standard 12V (marked) W739057 Tetrix NiMH battery pack. We did not measure the battery voltage; however, the (unloaded) initial motor speed when fed from the battery probably indicates variation of its voltage due to the previous test. Some charging was done between tests.
We repeated the power curve measurements for four sample motors. Three showed consistent performance, and one was slightly lower. Results follow:
----------------
With regulated 12V dc supply:
Motor 1: 10.8 Watts peak output mechanical power at ~75 RPM, 145 RPM initial motor speed
Motor 2: 10.8 Watts peak output mechanical power at ~75 RPM, 145 RPM initial motor speed
Motor 3: 10.1 Watts peak output mechanical power at ~75 RPM, 143 RPM initial motor speed
Motor 4: 10.9 Watts peak output mechanical power at ~75 RPM, 148 RPM initial motor speed
With Tetrix battery: (voltage > 14V)
Motor 1: 16.5 Watts peak output mechanical power at ~90 RPM, 178 RPM initial motor speed
Motor 2: 16.0 Watts peak output mechanical power at ~90 RPM, 173 RPM initial motor speed
Motor 3: 14.2 Watts peak output mechanical power at ~90 RPM, 172 RPM initial motor speed
Motor 4: 15.2 Watts peak output mechanical power at ~90 RPM, 176 RPM initial motor speed
Here is some posts from the Chief Delphi forum where several teams were trying to calculate the gearing or wheel diameter needed to climb a tower in a specified time using these motors. The math is interesting:
Sorry, I should have expressed that a little more clearly.
I meant a 2:1 speed INCREASE from motor shaft to wheel. Effectively making a 4" wheel behave like an 8" wheel mounted directly on the motor shaft.
Here's how I did the math:
Climb height = 110 inch (2.79 meter)
Energy = height X weight = height X mass X g
Energy (Joule) = height (meter) X mass (kg) X 9.8 m/sec^2
Example: if mass is 5 lb (2.27 kg) then energy = 62.2 Joule
Maximum motor output power (assuming a full Tetrix battery) is about 15 Watt at 90 RPM -- operating at different RPM will REDUCE the power.
Time to climb = Energy / Climbing Power
Climbing Power = Motor Power X drivetrain efficiency
If drivetrain efficiency is 75% and two motors are used, then Climbing Power is 30 X .75 = 22.5 Watt. So, Time to Climb is 62.2 / 22.5 = 2.8 seconds, and climbing speed is 110 inch / 2.8 sec = 39.8 inch/sec. If 4 inch diameter wheels are used, then wheel speed is 39.8 / 4*pi = 3.2 rev/sec = 190 RPM. To match this wheel speed to the 90 RPM motor speed, the gear ratio is 190/90 or ~2.
Thanks for the data Richard!
4"x1:1 versus 3"x1:2
(4"x1:1 is a 4" wheel with a 1:1 ratio, direct driven; 3"x1:2 is a 3" wheel with a 80T gear on the motor and a 40T gear on the wheel)
Since mass will affect every race, is the added mass to get a 1:2 gearing on a 3" wheel worth the complexity versus a direct drive 4" wheel? I don't think so. My charts show that a 3"x1:2 is only 0.1 seconds faster than a 4"x1:1 since adding gears adds weight (gear mounting, extra axle primarily). I'd suggest trying it with both and seeing what you gain from the flexibility in the design from 4"x1:1.
Edit -- Whoops -- the calculator didn't factor in another efficiency drop due to the extra gears -- so now 3"x2:1 is just on par with 4"x1:1.
For a given voltage, a DC motor has the most Power output at about half of its free speed. Torque is highest at stall, and decreases linearly to zero torque at free speed.
Here is a good example of engineering study and reasoning effecting the design choices:
Some folks here on CD have asked for a bit more data, so I am adding it here.
We used another of our dynamometers to measure mechanical output and efficiency for two of the Textric DC Drive motors (units 2 and 3 from the original post), with their gearheads removed. This gives some insight to the electrical and mechanical power losses.
At 12V dc, these two motors developed peak shaft powers ~ 17.6 and 15.8 Watts, respectively -- this is about 7 Watts more than was measured when the motors were tested with gearheads. That difference is the mechanical power loss in the gearhead, at peak loading.
Also, at peak shaft powers these two motors showed electromechanical efficiencies ~ 45% and 40%, respectively. In other words, motor 2 consumed 17.6 / 0.45 = 39 Watts, and motor 3 consumed 15.8 / 0.4 = 39.5 Watts, from the 12V dc supply. So motor 2 wasted 39 - 17.6 = 21.4 Watts, and motor 3 wasted 39.5 - 15.8 = 23.7 Watts, due to heating of their respective armature windings. These are the motors' electrical losses.
My conclusion -- teams might gain an advantage in climbing power by replacing the gearheads on these motors with more mechanically efficient alternatives, but the potential benefit is probably only a few Watts (my guess is 2 to 4 Watts). The time a team would spend refitting Tetrix motors with more efficient gearheads is probably better spent working on faster minibot deployment methods.
I am attaching a power curve for a Wankel engine just to show how different internal combustion engines are from electrical motors.
Classroom Session:
Torque From Wikipedia, the free encyclopedia
Loosely speaking, torque is a measure of the turning force on an object such as a bolt or a flywheel. For example, pushing or pulling the handle of a wrench connected to a nut or bolt produces a torque (turning force) that loosens or tightens the nut or bolt.
The symbol for torque is typically τ, the Greek letter tau. When it is called moment, it is commonly denoted M.
The magnitude of torque depends on three quantities: the force applied, the length of the lever arm[2] connecting the axis to the point of force application, and the angle between the force vector and the lever arm. In symbols:
Torque From Wikipedia, the free encyclopedia
- Relationship between force F, torque τ, linear momentum p, and angular momentum L in a system which has rotation constrained in one plane only (forces and moments due to gravity and friction not considered).
Loosely speaking, torque is a measure of the turning force on an object such as a bolt or a flywheel. For example, pushing or pulling the handle of a wrench connected to a nut or bolt produces a torque (turning force) that loosens or tightens the nut or bolt.
The symbol for torque is typically τ, the Greek letter tau. When it is called moment, it is commonly denoted M.
The magnitude of torque depends on three quantities: the force applied, the length of the lever arm[2] connecting the axis to the point of force application, and the angle between the force vector and the lever arm. In symbols:


where
τ is the torque vector and τ is the magnitude of the torque,
r is the displacement vector (a vector from the point from which torque is measured to the point where force is applied),
F is the force vector,× denotes the cross product,
θ is the angle between the force vector and the lever arm vector.
The length of the lever arm is particularly important; choosing this length appropriately lies behind the operation of levers, pulleys, gears, and most other simple machines involving a mechanical advantage.
The SI unit for torque is the newton metre (N·m).
This article follows US physics terminology by using the word torque. In the UK and in US mechanical engineering,[3] this is called moment of force,[4] usually shortened tomoment. In US mechanical engineering, the term torque means "the resultant moment of a Couple,"[5] and (unlike in UK physics), the terms torque and moment are not interchangeable.
Torque is defined mathematically as the rate of change of angular momentum of an object. The definition of torque states that one or both of the angular velocity or the moment of inertia of an object are changing. Moment is the general term used for the tendency of one or more applied forces to rotate an object about an axis, but not necessarily to change the angular momentum of the object (the concept which is called torque in physics).[5] For example, a rotational force applied to a shaft causing acceleration, such as a drill bit accelerating from rest, results in a moment called a torque. By contrast, a lateral force on a beam produces a moment (called a bending moment), but since the angular momentum of the beam is not changing, this bending moment is not called a torque. Similarly with any force couple on an object that has no change to its angular momentum, such moment is also not called a torque.
This article follows the US physics terminology by calling all moments by the term torque, whether or not they cause the angular momentum of an object to change
For more info see: https://en.wikipedia.org/wiki/Torque
Other useful formulas:


If torque is in newton metres and rotational speed in revolutions per second, the above equation gives power in newton metres per second or watts. If Imperial units are used, and if torque is in pounds-force feet and rotational speed in revolutions per minute, the above equation gives power in foot pounds-force per minute. The horsepower form of the equation is then derived by applying the conversion factor 33,000 ft·lbf/min per horsepower: The Tetrix motor is very small, so rating it in horsepower would be silly.

|
| ||||
Presenting the FIRST Tech Challenge 2014 - 2015 Season Game: Cascade Effect

(Video of the Game starts at 2:44)
Game Manuals, Description and Field Construction
click on the links below
Game Manuals, Description and Field Construction
click on the links below
CREO 2.0 Downloads
How to Model Almost Anything A beginers guide for PTC Creo with exercises to learn the basics of 3D solid modeling. It is a great starting point for FIRST teams that have not used 3D CAD before. Step by step instructions. http://apps.ptc.com/schools/How_to_model_almost_anything.zip
How to Develop a Product An advanced guide that will teach you how to bring a product through the product development lifecycle; from concept development to product retirement.
http://apps.ptc.com/schools/How_to_develop_a_product.zip
Creo Primer A PDF quick start guide.
http://apps.ptc.com/schools/Primer_Creo_2.pdf
Available Curriculum Guides Covers curriculum for all the PTC products. Serves as a reference when planning training.
FTC Kit of Parts and Field CAD Drawings Download these before you start designing your robot. These kits provide predrawn Tetrix and Field parts for quick assemblies.
|
Another instructional guide to help understand the basics of Creo and how to build parts and assemblies. Easy to follow, step by step.
| ||
|
Describes the Creo configuration and default units to be used.
| ||
Creo Installation Instructions and Licensing
| install_creo2_student_uni_download_instructions.pdf |
If you follow the installation instructions in the above document and it will not let you do the Simple License process, go back and see if you have better luck starting over, but right clicking on the setup.exe file so that you can specify that it is being run as "administrator". If that doesn't fix the license problem, you will need to do a manual install by following the "Offline" instructions. This requires you to run the "get_hostid.zip" file (it retrieves the mac address of your computer), you then need to login with a Creo account, and request a manual license. For this you will need the product code and the Host ID (from the program below).
Product Code: BK390206EDSTUDENTUNICL
Product Code: BK390206EDSTUDENTUNICL
| install_creo2_offline.pdf |
| get_hostid.zip |
PTC Creo 3.0
Installation Instructions:
http://apps.ptc.com/schools/references/install_creo3_schools.pdf
Configuration (Important!): After installing PTC Creo 3.0, we highly recommend that you apply our Schools Configuration. This will set some default settings for PTC Creo and get you started more quickly!
http://apps.ptc.com/schools/references/config_creo_schools.pdf
Training: PTC’s K-12 Program offers a variety of FREE training materials to get you up to speed and modeling as quickly as possible.
Expert Help: If you get stuck or have any questions, please feel free to reach out to our PTC experts on the Schools Program community.
http://communities.ptc.com/community/academic-program/schools-program
Image File: http://www.ptc.com/appserver/auth/it/esd/academicFree.jsp
Product Code: BH400407EDSTUDENTEDK12
Download the configuration executable here:
http://apps.ptc.com/schools/references/configure_for_schools.exe
Be sure to follow the configuration instructions in the pdf file shown above.
Creo 3.0 Quick Reference Card
http://communities.ptc.com/servlet/JiveServlet/downloadBody/6433-102-5-9759/CreoParametric_3.0_QRC.pdf
MathCAD
PTC Communities has a full set of examples for use in MathCAD. Follow this link to find downloadable zip files:
http://communities.ptc.com/docs/DOC-3621
Programming - RobotC, LabView
ROBOTC for FTC (www.robotc.net/ftc)
LabVIEW for LEGO MINDSTORMS for FTC - www.ni.com/ftc
FTC Team Resources - Page with links to many guides and links
- RobotC version 3.62
- RobotC version 4.62
- Robot Virtual Worlds
- Virtual Worlds Level Pack - FTC Cascade Effect
LabVIEW for LEGO MINDSTORMS for FTC - www.ni.com/ftc
FTC Team Resources - Page with links to many guides and links
|
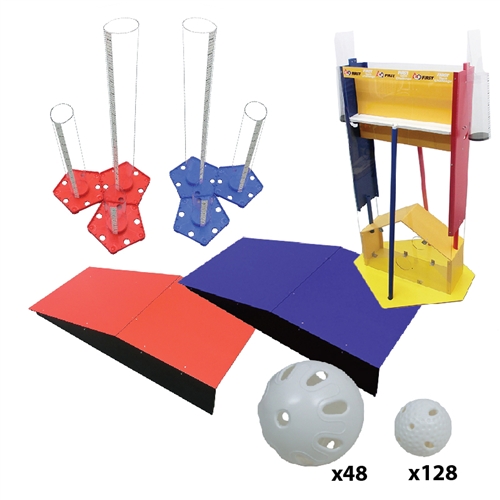
From AndyMark.com FTC 2015 Full Game Set (am-2970) Price: $450.00 Stock Status: In Stock Product Overview: This is the full set of official field elements needed for the 2014-2015 Game Cascade Effect to be used within the 12'x12' FTC field perimeter. Package Includes:
This product ships within 6 boxes, weighing approximately 80 pounds. |
Solution for creo fatal error
| config.pro |
Creo crashes with a fatal error on some computers. It seems to be a problem with certain Intel Graphics Drivers. This solution is suggested:
Support article from the Creo Archive for those who are interested in the many ways this manifests itself:
Title
A premature exit can occur when using an Intel Embedded Graphics card with Creo Parametric Creo 2.0
Description
· A premature exit can occur when using an Intel Embedded Graphics card
· A traceback.log file is created during launch when using an Intel Embedded Graphics card
· A traceback.log file is created when launching the application on Microsoft Windows 7 x64bit
· A premature exit can occur when using an Intel Embedded Graphics card with external 3D Graphics card
· A traceback.log file is created when starting the application on Acer machine with Intel Embedded Graphics card
· Exit during the start on Microsoft Windows 8
Applies To
· Creo Parametric 2.0 M090 - M110
Cause
· Implementation of Order Independent Transparency for NVIDIA Graphics cards, starting in Creo Parametric 2.0 M090, please refer to CS116210
· Embedded Intel Graphics cards are not supported for use with Creo Parametric 2.0
· Please refer to the Platform Support Page for a list of supported configurations
· Due to unavailability of external graphics card (e.g. NVIDIA, AMD etc.)
· Does not recognize Mother Board inbuilt graphics card (Intel (R) graphics)
· OpenGL infrastructure changes made to support Order Independent Transparency (OIT)
Resolution
· Reported to R&D as SPR 2220320
Corrected in Creo Parametric 2.0 M120
· Where old Intel graphics drivers are detected and enable_opengl_fbo to no is automatically set
· Solution on the basis of conditions for graphics cards on machines, machines with:
· Condition 1: Only old Intel (R) HD Graphics Cards (e.g. Intel (R) HD, Intel (R) HD 3000 etc.)
· No updated drivers will be available from Intel for such old graphics cards and that has been confirmed by Intel
· Only solution is to set hidden config.pro option enable_opengl_fbo to no
· Condition 2: New Intel (R) HD Graphics Cards (e.g Intel (R) HD 4000 etc.)
· Download and update the graphics drivers from Intel web (Intel Download Center) OR
· Refer Workaround section
· Condition 3: Old Intel (R) HD Graphics Cards in addition to External 3D cards (NVIDIA, AMD etc.)
· Disable Intel (R) HD Graphics Card (Contact Company IT to disable Graphics Card) OR
· Refer Workaround section
· Condition 4: New Intel (R) HD Graphics Cards in addition to External 3D cards (NVIDIA, AMD etc.)
· Download and update the graphics drivers for Intel card from Intel web (Intel Download Center) OR
· Disable Intel (R) HD Graphics Card (Contact Company IT to disable Graphics Card) OR
· Refer Workaround section
· Workaround for datecodes prior to M120
· Setting enable_opengl_fbo to no:
· Disables low level OpenGL code used for Order Independent Transparency, better raster exports, and visual quality
· Disables Order Independent transparency
· JPEG/TIFF export for part/assembly may mismatch with actuals on screen
· There can be some performance impact as it is not a certified configuration
· Use the specified config option only on affected machines. It is not recommended to set this option on unaffected machines
· Avoid using Creo Parametric 2.0 M090 - M110 with only an embedded Intel Graphics card
- Download the attached config.pro file
- Put the config file in C:\Users\Public\Documents
- Restart Creo 2.0
Support article from the Creo Archive for those who are interested in the many ways this manifests itself:
Title
A premature exit can occur when using an Intel Embedded Graphics card with Creo Parametric Creo 2.0
Description
· A premature exit can occur when using an Intel Embedded Graphics card
· A traceback.log file is created during launch when using an Intel Embedded Graphics card
· A traceback.log file is created when launching the application on Microsoft Windows 7 x64bit
· A premature exit can occur when using an Intel Embedded Graphics card with external 3D Graphics card
· A traceback.log file is created when starting the application on Acer machine with Intel Embedded Graphics card
· Exit during the start on Microsoft Windows 8
Applies To
· Creo Parametric 2.0 M090 - M110
Cause
· Implementation of Order Independent Transparency for NVIDIA Graphics cards, starting in Creo Parametric 2.0 M090, please refer to CS116210
· Embedded Intel Graphics cards are not supported for use with Creo Parametric 2.0
· Please refer to the Platform Support Page for a list of supported configurations
· Due to unavailability of external graphics card (e.g. NVIDIA, AMD etc.)
· Does not recognize Mother Board inbuilt graphics card (Intel (R) graphics)
· OpenGL infrastructure changes made to support Order Independent Transparency (OIT)
Resolution
· Reported to R&D as SPR 2220320
Corrected in Creo Parametric 2.0 M120
· Where old Intel graphics drivers are detected and enable_opengl_fbo to no is automatically set
· Solution on the basis of conditions for graphics cards on machines, machines with:
· Condition 1: Only old Intel (R) HD Graphics Cards (e.g. Intel (R) HD, Intel (R) HD 3000 etc.)
· No updated drivers will be available from Intel for such old graphics cards and that has been confirmed by Intel
· Only solution is to set hidden config.pro option enable_opengl_fbo to no
· Condition 2: New Intel (R) HD Graphics Cards (e.g Intel (R) HD 4000 etc.)
· Download and update the graphics drivers from Intel web (Intel Download Center) OR
· Refer Workaround section
· Condition 3: Old Intel (R) HD Graphics Cards in addition to External 3D cards (NVIDIA, AMD etc.)
· Disable Intel (R) HD Graphics Card (Contact Company IT to disable Graphics Card) OR
· Refer Workaround section
· Condition 4: New Intel (R) HD Graphics Cards in addition to External 3D cards (NVIDIA, AMD etc.)
· Download and update the graphics drivers for Intel card from Intel web (Intel Download Center) OR
· Disable Intel (R) HD Graphics Card (Contact Company IT to disable Graphics Card) OR
· Refer Workaround section
· Workaround for datecodes prior to M120
· Setting enable_opengl_fbo to no:
· Disables low level OpenGL code used for Order Independent Transparency, better raster exports, and visual quality
· Disables Order Independent transparency
· JPEG/TIFF export for part/assembly may mismatch with actuals on screen
· There can be some performance impact as it is not a certified configuration
· Use the specified config option only on affected machines. It is not recommended to set this option on unaffected machines
· Avoid using Creo Parametric 2.0 M090 - M110 with only an embedded Intel Graphics card
Locating other ftc teams
We receive a lot of requests from people who are trying to locate a FTC team in their area. They may be wanting to join a team or just meet up with them. I found a link which helps... up to a point. http://www.ilfirst.org/ftc/teams/teams-list.html
There is also a similar page for FRC: http://www.ilfirst.org/frc/teams/teams-list.html
There is also a similar page for FRC: http://www.ilfirst.org/frc/teams/teams-list.html
The engineering design Process
Throw something together or really take it through a design process???... Here's a good video showing by Randy from the Myth Busters to show how the design process works and what role CAD plays in making this process more efficient, the build process quicker and cheaper.
2013 Game field construction
If you need a playing field and nobody in your area has one, the following documents tell you what to buy and how to build it. The instructions are very specific, including part numbers of the products carried in the local stores.
| ftc-2013-2014_game_bom_shopping.pdf |
| low-cost-perimeter-build-guide.pdf |
| ftc-2013-2014_playing_field_build_guide.pdf |
FTC provides many resources for their robotics teams.
Visit the FTC Toolbox for resources on the Samantha Module, Programming and Design, Field Control System, Tetrix and a variety of other topics (found under "Additional Resources"). You may also find the Document Library, Forum, News and E-mail blasts and Marketing Tools pages helpful.
Visit the FTC Toolbox for resources on the Samantha Module, Programming and Design, Field Control System, Tetrix and a variety of other topics (found under "Additional Resources"). You may also find the Document Library, Forum, News and E-mail blasts and Marketing Tools pages helpful.
| robot__drive_systems.pdf |
FTC TIMS and STIMS: Communication to the teams is managed through TIMS for the adult mentors and coaches and through STIMS for the students. If everyone on the team signs up through STIMS and electronically accepts the terms and conditions of the waiver, the waiver covers the entire season, which saves a lot of paperwork when preparing for a competition.
http://www.usfirst.org/roboticsprograms/ftc/stims
Programming and Design resources:
http://www.usfirst.org/roboticsprograms/ftc/programanddesign
RobotC programming software:
http://www.robotc.net/download/nxt/ This software is not free but it is the preferred text based programming software for FTC robots in our area. The IDE programming environment is very friendly with built in syntax help and real time debugging. Cost is around $80 for a single seat and $150 for a Team license which handles six seats, but expires annually. There are perpetual licenses available which never expire but cost incrementally more for the initial license. There is also an option for Virtual Worlds where you can download your compiled code to a virtual robot and test it out in a virtual game. They have this years game, the Block Party, in the Virtual World. The huge advantage to this software is that you can program and test the robot without having the actual robot in your possessions. Every team member can be productive programmers. Virtual World costs about as much as the RobotC license.
3D Computer Aided Drafting (CAD) software - PTC Creo Student edition:
This 3D software is offered to FTC Team members for free. Finding the correct download is frustrating, so here's a link to a quick install guide complete with the activation code: http://apps.ptc.com/schools/references/install_creo2_student_k12.pdf
Carnegie Mellon offers a Robots Academy through their website: http://www.education.rec.ri.cmu.edu/
Their links and curriculum cover most of the topics which are important to a FTC team. Included in this are videos for RobotC programming: http://www.education.rec.ri.cmu.edu/previews/robot_c_products/teaching_rc_lego_v2_preview/index.html
Electrical Distribution Products for the robot: http://www.powerwerx.com/powerpole-power-distribution/
What is a Samantha module and who is this named after? Well we can help with the first part. The Samantha module is the wireless network communication module that is required for FTC competition. You order it through the FTC team builder pages. For more information see this web page: http://www.usfirst.org/roboticsprograms/ftc/samantha
2013/2014 Game Rules:
Game Video:
Game Video:
FTC BLOCK PARTY Game Manual, Part 1 (PDF)
FTC BLOCK PARTY Game Manual, Part 2 (PDF)
FTC BLOCK PARTY! One Page Game Description (PDF)
FTC BLOCK PARTY Game Manual, Part 2 (PDF)
FTC BLOCK PARTY! One Page Game Description (PDF)
How do you qualify for the Championships?
Teams have only two chances to qualify in Illinois for the State Championships. Although there are currently six qualifiers at this time, this may grow to eight due to the number of new teams in the Chicagoland area. Teams should look at their schedules and select the two qualifiers which will work out the best. Once registration opens, the teams will be asked to pick three dates which work best. A lottery will assign the teams based on their first, second and third choices. If you miss out in Illinois, it is possible to go to a qualifier for another State, but you would need to attend and compete in that State's Championship.
The Illinois FIRST website has good information on the Tournaments along with the complete schedule:
http://www.ilfirst.org/ftc/events/ftc-qualifying-tournaments/
FTC events pack a lot of activities into one day.The main events for a typical tournament are:
- Team Check-in
- Robot Hardware and Software Inspection
- Judges’ Interviews
- Drivers’ Meeting
- Practice Matches
- Opening Ceremony
- Qualification Matches
- Alliance Selection
- Elimination Matches
- Awards and Closing Ceremony
